
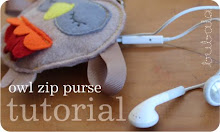
Finally as promised here is a tutorial for the little owl purse I designed and made for my daughter's birthday a few months ago, seen here. It's a great little project for a gift or just for your little one, it uses up small pieces of felt and ribbon, and is fun to make. It makes a great little change purse or ear bud holder. My kids like to clip them onto their jackets or pockets when we go out.
Below is the tutorial and a link to a pdf pattern. Please do let me know if you try it out (and also if I've made any mistakes - I'm new to writing tutorials!).


You will need:
Felt: I'd recommend using a thick wool or wool blend felt as it's lovely to work with and durable. I used a beige colour for the body and feet, then a darker colour for the mask and bright feature colours for the crest.
Clip: I've used a swivel clip with a ring at one end, found it stationery stores. This clip allows you to attach the purse to a bag, backpack, school bag, pocket or anything you like. If you don't want to use a clip you could also use a split ring or just the loop of ribbon (see next note) if you prefer.
Ribbon: You will need a length of ribbon about 20cm (8") long in complimentary colour to the body felt, for the wings, and also a small piece of ribbon to loop through the clip - I used a different ribbon but you could use the same as the wing ribbon, about 5cm (2") long.
Thread: I used a top stitching thread for the stitching as it's thicker and acts as a design feature, but ordinary thread would also work fine.
You could experiment with the colours of your felt, thread and ribbon or stick to the colour scheme here.

Step 1: Cut out all pieces of felt using pattern pieces from pdf attached. Take the front body piece and pin on the mask, beak and crest pieces, as shown below. The crest pieces should sit directly on top of each other, aligning at the top (straight) edge.

Step 2: Machine sew first around the mask and beak, sewing close to the edge. Then sew a straight line through the top of the crest, making sure all 3 pieces are caught in the process. Remember to back stitch to secure the ends.

Step 3: Create eyes for the owl - either embroider with embroidery floss (as shown in first picture above) or sew on buttons. You could also use a fabric pen to draw them on. See the end of the tutorial for ideas on sleepy/awake eyes*.
Step 4: Cut out rectangular opening on back body piece as marked on the pattern. Pin the zip into place as shown and sew right around the edge of the rectangle, just inside. Go slowly when you are going over the zipper, especially if you are using a metal one, so that it doesn't jar your machine.


Cut the excess off the zipper. Don't use your best sewing scissors as the zipper teeth will blunt the blades.

Step 5: Place the back body piece on your table so that the inside is facing up (as shown below). Put the feature ribbon through the ring of the clip, as shown, and pin it to the top of the body, where shown below. Now take your ribbon for the wings and cut it in half (each will be about 10cm (4") long). Loop it so that the ends come together as shown and pin them to the sides of the body. Then lastly take the felt feet and pin those to the base of the body.

Place the front body piece on top, creating a sandwich. Pin this together all around the body then sew all the way around, making sure you catch in all the elements (clip ribbon, both wings and both feet). You don't need to finish any of the edges in any way as felt doesn't fray - yay!

Trim off any excess felt around the edges of the body to neaten it and voila, you are done!

- - - - -
* The owl looks cute either awake or asleep, or even winking (one open one closed). Try using buttons or beads for open eyes.

And hey, it's Thursday! There is creativity galore awaiting you over here at My Creative Space.


Great tutorial and it looks really easy! They are so cute... I want to make one... or two :)
ReplyDeleteThey are just sooooo cute, I love them.
ReplyDeleteGreat tutorial too, well done.
Claire :}
Wow... that's a lot of owls! I'll have to let G loose on your tutorial over the holidays. Looks like a handy purse and she has the creating bug.
ReplyDeletelove it Jo, will definitely give it a go!
ReplyDeleteOmigosh, so cute!! I am pinning this for later, I love owls!
ReplyDeleteHi Jo! I have been wanting to make these for a while but when I tried to open the PDF google docs says I don't have permission. I've sent you a request, which I hope is ok. Thanks for sharing this gorgeous project! Janette
ReplyDeleteJust found this wonderful blog and project. Made a little owl and love it. I used a zipper removed from an old pair of jeans and substituted felt for the ribbon wings because that is all I had. It turned out so cute! I attached it to a backpack made from recycled jeans. Thanks so much for the free pattern and great tutorial. Love how each of your owls has their own personality.
ReplyDelete