Monday, October 28, 2013

Green Bee Amelia dress

My KCW efforts kind of crashed and burned last week due to having the attention span of a gnat various other things to get through, but I do hope to finish it this week and not end up with more UFOs -arghh!

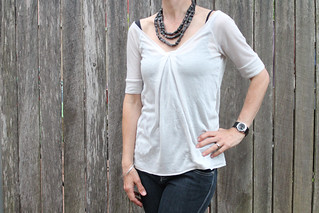
This is a dress I made a few weeks ago but hadn't blogged yet. I fell in love with Green Bee's Amelia dress when I saw this one, and then later this one. Despite the fact that I couldn't find much online about it, I bought the pattern. I thought the general shape would suit me and loved the fact that it's cut on the bias.

IMG_2722

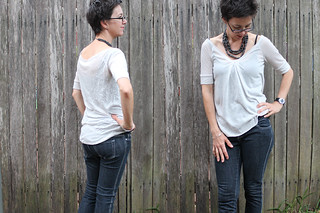
I made a muslin, then made a few modifications to the fit, subtle things but I think it's definitely made the fit better.

IMG_2718_comp

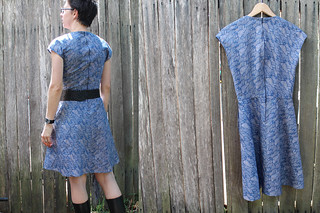
The zip is bubbling out a bit, which I guess is the bias cut fabric, and I probably should have done some sort of stabilisation on it. I couldn't check the pattern instructions to see what to do though as I'd lost them :-( I took them to the playground to read while the kids played (sewing nerd ;-) and accidently left them there! So then I just winged it with what I remembered I'd read and what made sense to me. It's not a super complicated pattern and went together quickly.

IMG_2728

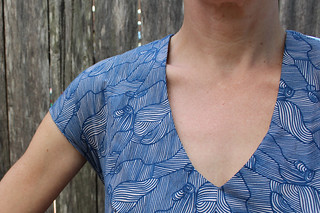
I chose the fabric from Spotlight, a Japanese cotton, and loved the pattern. But in hindsight I don't think it works well. Maybe it's just that it's too much of the same thing, but the dress feels frumpy to me and just a bit blah, particularly when not accessorised, as below.

IMG_2732

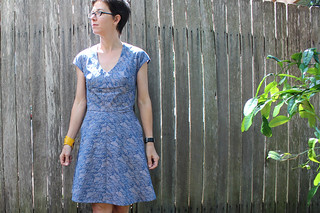
(big sigh) So I'm not loving this dress unfortunately. I think I should just wear it a few more times and see if it grows on me, but I'm not super hopeful. Maybe I just need to use a striped fabric as in the version I loved, or maybe the style doesn't suit me afterall, or the fabric is too heavy or ... (I could go on and on).

Any thoughts? Do you have those sewing blahs where you don't like what you've made occasionally? Say it's not just me!


Wednesday, October 23, 2013

KCW Japanese top and bubble shorts

I've been wanting to make my big girl a short sleeved blouse for summer, and have had my eye on Figgy's Ayashe top but decided to use my Japanese pattern book instead (the shorts she's wearing here are from the same book).

IMG_2896

She chose this apple print cotton and it sewed up nicely but I got a feeling making it that it was going to be too small... and it was, so I did some alterations to save it, mainly making the armholes and neckline larger. I'd used the largest size in the book, size 8, which would usually be her size, but I guess Japanese children are smaller.

IMG_2897

IMG_2903

And on checking the Ayashe pattern details it only goes up to size 8/9 too. In any case it made me realise that she's entering that stage when she's getting too big for children's sizes but not big enough for adult sizes.

IMG_2900

I also finally finished the bubble shorts for one of her best friends that I'd promised ages ago. The poor girl had resorted to very timidly asking my girl how they were going - oh the shame, letting a little girl down! I think I'll wrap them up nicely and add something special to say sorry.

Do you have that problem with the sizes? Find it hard to buy appropriate patterns/clothing for your almost tween?

Sunday, October 20, 2013

By Hand London Polly top and summer sewing list

Have you seen By Hand London's newest pattern, the Polly top? It's lovely and it's also free! When I saw it I instantly knew what I'd like to make it in, a fabric I've been saving forever, but thought I'd better make a muslin first...
IMG_2891
But I ended up liking the scrap fabric muslin, so I finished it off and it's now a wearable muslin :-)
IMG_2881_comp

The fit is a little off so I'm adjusting it for the proper version, though I will still wear this.

- - - -

More on the Polly top later but for now, before Kids Clothes Week starts tomorrow I thought I'd share my thoughts on summer selfish sewing, for us here in the Southern Hemisphere.

I'm considering these patterns:

By Hand London's Anna dress. This pattern is taking the online sewing world by storm, if you haven't noticed already. I fell in love with the Anna instantly thought the shape would suit my figure. I particularly like this and this version.


Sewaholic's Saltspring dress. The only pattern I've sewn of Tasia's is the Minoru, which is my sewing pride and joy :-) But apart from that I find Sewaholic patterns a little girly for me. When I first saw the Saltspring I wasn't tempted at all, but, as often happens with us sewing fanatics, all it's taken to convince me otherwise is seeing a few amazing versions, like this one and this one. I love the thought of the maxi version in a lightweight silk like this one or jersey like this one (complete with beautiful plaited straps). And I think keeping it in a solid will make it less girly.

Victory Patterns Simone top. I love all the details on this top. If my patience could hold out and I chose great fabrics I can picture it looking good. I love my Ava tops, so I'm thinking this would be a winner too.

Grainline Studio's Maritime shorts. Shorts. Hmm, I've not been a fan of shorts in the past. I find them not very flattering at all to my leg shape (shapeless, and I have lots of post-pregnancy spider veins, def not my best feature). BUT I can see how practical they are. So maybe if I make them a little longer and in a chambray or light weight denim to keep them low-key. I like this and this version.


What's on your list for summer sewing? Or if you're on the opposite side of the world, what were your favourites last summer? I'd love to know.

Wednesday, October 16, 2013

Kids bucket hat

We were due to go away recently and  I did my usual pre-holiday rush around shopping for things. You know how it goes: one child needs socks, another has outgrown her shoes, someone else has been making do with something that now desperately needs replacing... at least that's how it goes in our house - holiday time highlights all those little things that need to be done!

Kids bucket hat

I had planned on buying my boy a sun hat as I didn't want to stay up til all hours the night before sewing (which I must admit I've done many many times). But I couldn't find anything I liked for a price I was happy to pay, so I gritted my teeth and got on with sewing one (after some grumbling to the Mr about how I'd prefer to be sewing anything else ;-). I really don't enjoy sewing bucket hats - all that easing in around the circle trying not to get puckers does my head in, and come to think of it I don't enjoy easing in at any time - I like those top patterns where you attach the sleeve cap to the bodice and then just sew from the sleeve right down to the hem. I know it's not the 'correct' way to do it but saves a lot of frustration!

Bucket hat in action

Anyway, I used this pattern which I've used before and is fine (I think most use the same easing-in method), and remembered this time to add a heavy interfacing to the brim to keep it stiff. The fabric I used was some leftover scraps of Ikea fabric that I'd screen printed and used for Abby's baby bag. Incidentally I've finally added a link to my tutorial on the right.

And speaking of Abby, have you seen her blog post announcing that she's doing a month of handmade present ideas for men and boys in November? What a great idea. I think this hat would be a good one, if only I could get over my dislike of easing in!

Sunday, October 13, 2013

Wrist cuffs on Etsy and Madeit

In a little burst of energy today I re-activated my Etsy and Madeit shops to list some of these leather wrist cuffs that I've been making.


When a friend recently asked me what I was selling in my shop and I told them there was nothing at the moment it got me to thinking of why I do (or don't !) list things, and I came to the conclusion that, for the moment anyway, I list things to sell when I'm enjoying making something and think others may like it to. I wish I could be more consistent but at this stage it just happens when I'm inspired.


So there's a little collection of cuffs and things waiting for new homes :-)


Hopefully this burst of creativity will inspire others too. And hopefully also top up my Paypal account so I can go and buy some handmade Christmas presents (sorry for mentioning the 'C' word ;-) and some new Indie patterns for me (oh, the list is loooong, hee hee).

Tuesday, October 8, 2013

Rhubarb icecream addiction

My latest food fad is rhubarb, and in particular homemade rhubarb ice cream. It's so tangy, creamy, sweet and prettily pink. I am seriously tempted to make batch after batch of it and fill our freezer for when rhubarb season is finished ;-)

IMG_2755

Recently I found myself in possession of lots of rhubarb when I bought a huge bunch at the markets and then went to visit my mum who had heaps of it growing and also gave me some. I vaguely remembered having a rhubarb ice cream cone in an independent cinema once and being blown away by the taste, so thought I'd try to recreate it. My first, quite lame, attempt involved just stewing the fruit with sugar and a little water  and then stirring it into softened vanilla ice cream. But it was too hard, not creamy enough and just not right :-(

IMG_2710

Then I stumbled upon this extremely simple recipe and it's a winner! If you're even a mild rhubarb fan, try it, I think you'll like it.

IMG_2714

- - - -

Rhubarb ice cream (recipe based on this one)

500 grams rhubarb
250 grams caster sugar
150 ml double cream  

Wash and chop the rhubarb into smallish pieces, put into a large pan along with the sugar and put the lid on. Leave to simmer until the fruit is soft. Allow to cool and then refrigerate until cold.
Mix the rhubarb and cream together then pour into an ice-cream maker* and churn until thick. Eat straight away or store in the freezer. When serving from the freezer allow to thaw slightly before serving.

- - - -

*I'm not sure if I'd try to make it without an ice cream maker (I just have a small cheap model that does the churning for you) as you do want the texture to be light and I'm not sure this would be possible by hand?

IMG_2758

Tuesday, October 1, 2013

My sloppy Sloppy Josephine

Sloppy Josephine Papercut Patterns

The more I sew for myself the more I realise how important drape, fit and form are... and with that in mind I recently ordered the Sloppy Josephine pattern by Papercut Patterns. I had been lusting after this pattern for quite a while. I've always loved that slouchy look (camisole straps showing and all - that's surely a feature of this top), it lends itself beautifully to layering and has a relaxed but elegant feel. So although that little voice in my head kept saying "it's such a simple pattern, you should draft it yourself and save some cash", the voice that was louder was this one: "it's the cut of the pattern that's lovely... you could stuff around for ages trying to draft something similar and not get it right - or just buy it! And hey, you'll be supporting a small company, that's gotta be good!".

Sloppy Josephine Papercut Patterns

The irony of all that about simple lines etc etc is that I totally stuffed up this top and it ended up not so simple afterall! The original lines are a bit lost now that I have a massive pleat in the front. To explain: this is my second attempt at Josephine. The first I made as a muslin and was fairly uneventful, all went well and I liked the fit, but the fabric was a bit thick and didn't have the lovely drape that a lighter weight would give. So I pulled out this soft almost mesh-like pale grey fabric. I don't know what its made of and found it in one of the cheap fabric places I go to when I need something inexpensive.

The fabric was a bit hard to work with but all was going OK til I got to the neckline, which stretched and moved so much that it looked a sight when it was done :-(. So I carefully cut it off - there was no unpicking it, I'd used the overlocker and well, life's too short! Then I made another band and reattached it. Still no success. Then I grumpily put it aside for a week or so to take the sting out of the whole process (do you do that?!). So by the time I went to sew on the third (or was it fourth?) neckband, it worked well enough finally, but the neckline was so big that it was falling off my shoulders, and not in a good way! Pulling in the excess with a pleat at the front was the only thing I could think of to save it, because despite all of this I do really like this top.

Sloppy Josephine Papercut Patterns

So now I am on the hunt for beautiful tissue weight knits that I can use to make more Josephines. Can anyone help me with my neckline issue? Maybe I need to add something to stabilise the band? I'm not usually one for using all sorts of products but I'm concerned that this is going to keep happening. Any suggestions welcome.
Related Posts with Thumbnails