Monday, January 30, 2012

Back to school pencil case


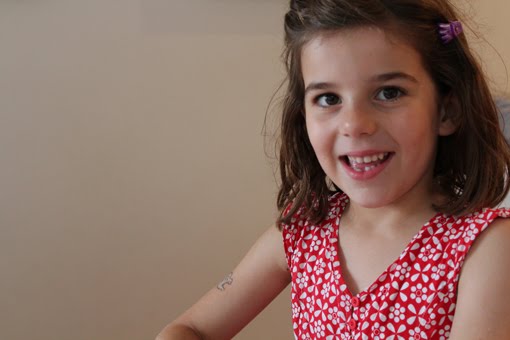
My big girl started the new school year today, her first day in Year 2, with her first wobbly tooth and a new pencil case.

When she told me on the weekend that she needed the pencil case, of course I saw a crafting opportunity, and was pleasantly surprised when she chose this groovy Ikea stripe fabric over some more obvious girly prints.


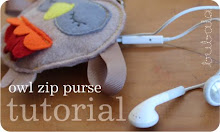
I made it the same way I make my lined zip purses (tutorial coming soon - I promise!) but on a larger scale, adding some heavy iron-on interfacing to make it extra sturdy and a heavy duty jacket zip.


Then, because I'm a sook and like her to have a little extra touch of love from me to take with her, I embroidered her name onto a piece of cotton ribbon and made a zipper pull out of it. She was happy with it and then took me on a stationery shopping trip to fill it up. Do you remember the excitement of getting a new set of pencils?

But the real point to this post was to try out my new camera! I was lucky enough to get a digital SLR for Christmas and finally I've had a chance to play with it. I need to do LOTS of reading and playing around with it (it's a while since I've had an SLR) but even just playing around with the macro function and using it on the automatic setting is great, it takes such fabulous shots. Below is one of my big girl, wobbly tooth and all. It was late afternoon when I took these shots and the camera's dealt with the low light really well, something my old snappy wasn't built for.

Friday, January 27, 2012

Friday photos


top
loving seeing my middle child (who I thought was not interested in art) exploring her creativity endlessly lately fascinated by macro photography as always, in this case a thistle at the Mr's family farm, and looking forward to using my new camera! happy to finally have the last touches done on our kitchen 4 years on, with a longed-for shelf to hold my 'precious things', and what could be more precious than things by Australia's Dinosaur Designs and Bison, right? :-)

bottom
glad be wearing something I finally made from the treasured piece of Nani Iro fabric (more on this next week) feasting on my latest fad of homemade pitta bread enjoying looking at the beautiful beetroot plants in the garden. Big girl has stopped asking me now when we're going to pick them and accepted that I grew them to look at ;-)

Tuesday, January 24, 2012

Homemade pitta bread


While visiting family over the Christmas period, my sister-in-law and niece made homemade pitta bread pockets to bring to a BBQ. They were so yummy that when we returned home I tracked down a recipe. The first recipe I tried worked really well. And it was easy. So if you're at all interested in bread making, baking, or just making homemade versions of things you normally buy, I'd urge you to try this... it really is worth the effort.


In the meal above we ate it with greek salad, roasted cauliflower, hummous, dolmades and halloumi salad, but it's also equally good split and stuffed with a few humble salad ingredients.


Homemade pitta bread adapted from Kitchen Simplicity
Makes 8

1 1/8 cup warm water
1.5 tsp. sugar
1.5 tsp. instant yeast
1 Tbsp. olive oil
2 cups plain flour
1 cup whole meal plain flour
1 tsp. salt

Stir sugar into warm water. Sprinkle yeast over top and allow to stand for 10 min. Stir in olive oil, both flours and salt. Knead until soft, pliable and barely sticky (add a bit more flour if needed). Cover with a damp tea towel and leave in a warm area to rise for 1 hour.

On a lightly floured surface roll dough into a 12 inch rope. Cut into 8 pieces. Roll each piece into a ball and place under a damp tea towel (don't skip this step - the ball shape forms the pockets). Taking one piece at a time, roll into about a 7 inch circle or oval (do not make it any larger because if the dough is too thin the pita will not puff in the centre). Place back under the damp tea towel making sure the surface is dusted with flour so it does not stick. Repeat with remaining dough. Allow to rise for 30 minutes until slightly puffed. Meanwhile preheat the oven to 250ºc/500ºF.

Put 1 or 2 pittas onto a wire cooling rack and place it directly on the oven rack. Bake for 4- 5 minutes until puffed in the centre and just starting to brown on the sides. Remove and place back under the damp towel to cool and soften. Repeat with remaining pitas.

Once cool store in an airtight container and refrigerate for a couple days or freeze for 1-2 months.


Thursday, January 19, 2012

My Creative Space - girly dress


It's nice to see Our Creative Spaces back up and running for the year - it's like welcoming an old friend back :-)

Do you remember this fabric that I found late last year? I decided to make another version of Simplicity 3835, not because I really loved the style but because I knew it was a quick sew and just wanted a summer dress!


The style tends to look a bit shapeless on me so I considered putting front waist darts in but then thought I'd probably have to put a zip in, which might make it a bit restrictive to move in and look a bit strange with the elasticated bits so.... I put in a few short rows of shirring (any excuse for a bit of shirring ;-) to give it some shape. There's a bit of a weird pulling going on around the bum area which if I knew properly about sewing I'd probably work out how to fix, but it doesn't bother me too much.


I also added in-seam pockets as we all know how useful pockets are in a dress. They do add to the weird pull of the dress drape though. I think maybe the fabric is too fine to hold them. Ah well, at least they're useful.

Overall the dress is a tad too girly for me (hopefully not 'little girl' looking though - that would be tragic) but if I try to 'rough it up' a bit with accessories etc it's not too bad (any suggestions welcome). I think it might also work layered when the weather turns cooler, if I'm still keen on it then. Ah, I'm so fickle.

- - - -

By the way, is anyone else having problems commenting with Blogger recently? I've had several problems lately, it's driving me nuts. Let me know if you have any problems too and I'll find someone at Blogger to have a whinge to.

Tuesday, January 17, 2012

Polymer clay beaded necklace tutorial


Late last year I suddenly got the urge to play around with polymer clay to make a few necklaces, one for my niece, one for my neighbour and of course several for myself ;-)

I really liked how they turned out and found it was a fun and quick craft activity (with something wearable at the end - yay!), so I thought you might like to try it too. It's pretty simple but I thought a tutorial might be nice all the same, you might find my tips useful. Let me know if you try it. I hope you enjoy it!


- - - Polymer clay beaded necklace tutorial - - -


What you'll need

• Polymer clay in 2/3 different colors There are a few different brands of around. I chose Fimo because I'd heard about it but most importantly I liked the colors in the range. It can be bought at art and craft stores.

• Cording I use a lovely hemp string that I bought in a bead shop. It comes in a range of lovely neutral colours that won't compete for attention with your beads and has a lovely natural feel. Its comfortable to wear on your neck as long as there's not too much weight in the beads. You could also use cotton or leather cord, just remember to make sure it's not too thick.

• Large needle Something thick like an embroidery needle makes a good implement for putting a hole through the beads for threading. A thin skewer or even a toothpick would also work.

• Oven tray, baking paper and oven Polymer clay needs to be heated in a warm oven in order to harden it.

• Wooden button To use as decoration. I found mine a few years ago at a handmade market, but you may be able to buy them on Etsy. Otherwise a large beautiful vintage button would also work well. I think a button is a nice touch but you can leave it out if you prefer.

Making the beads


Cutting your clay
Cut or break off a piece of the clay. I found cutting a square about the height 2 ridges made a good sized bead.


Rolling a ball
Squash your chunk lightly into a rough ball shape then roll it lightly in your palms to create a ball. Try to do this without over handling the clay. I find that while the clay can be worked quite a lot, the more I play with and touch it the more dirt and grit it picks up, and that's not the look you want for your necklace - while charmingly wonky balls might be cute, dirt and dust are not so nice looking.


Making a hole for the cording
Then take your needle and lightly push and twist it into the ball horizontally towards the other side. You're looking to create the hole without pushing the ball out of shape.


The finished hole should look neat at each end if possible. At this stage you'll need to think about how thick your string is. If your needle isn't thicker than your string (you don't want to end up with beads you can't thread) move your needle around inside the hole to widen the hole slightly. This sounds a bit clunky but it works really well.

* you can also make little discs if you like, as you can see on the pics of the finished necklace. Make a ball slightly smaller than the other/s then flatten it between your finger and thumb until it has a similar circumference to your ball. Make the hole in the same way, taking care not to squash the disc out of shape.


Bake the beads
Make the rest of your beads. I like to use about 5 - 10 for a nice balance and so that it hangs nicely. You can always make more than you think you'll need and try out different combinations once they've been baked.

When you have all of your beads ready, place them on a baking sheet lined with baking paper and bake them in the oven following the directions on the clay pack. Mine cooks at 110c (230f) for 30 minutes. Leave until completely cool. After they're baked the beads are quite durable and seem to be water proof.


Stringing
When your beads are cool cut a piece of your cording about 90cm (35") long and thread on your beads and wooden button.


Tie a slip knot in the end of the string. This makes it easy to undo if you want to change the combination of beads at any time, though it does put a bit of stress on the string each time, so I try to not undo the knot too often. Better to just make a few more necklaces in different colors ;-)


You can wear your necklace with the wooden button next to the beads or alternatively at the back of your neck, letting the beads sit freely.

You're done! Enjoy wearing your new creation.


Sunday, January 15, 2012

2011 - printmaking


Well, it's definitely time to wrap up my look back at 2011 - January is half over today!!

I've always loved block printing, and last year I made and used many stamps. They're so satisfying and quick to do - I'd really urge you to try it if you're looking to try some printmaking and wondering where to start. It's pretty quick and cheap to start up... a trip to the art shop, a couple of free hours to play around and you're on your way. Stamps are useful for making gift cards and decorating all sorts of things.

The thing I'm most excited about from last year though, is learning to screen print (or re-learning - I'm sure I did it at school and uni but that's a loooong time ago! ;-). I'm hoping to experiment more this year.

And I participated in my first print swap this year, which really encouraged me to get going - I'd recommend it for nudging you along if, like me, you sometimes get stuck in your thoughts rather than actually doing it!

I've got a couple of new projects to show you this coming week... enough of 2011!

Hope you're having a nice weekend.

Thursday, January 12, 2012

2011 - knitting


Link
I really enjoyed my knitting last year, starting with the 'schoodie' pack from Olive & Me that I won from the lovely Kate, which made me remember and build on my very very basic knowledge of knitting. Then on to the challenging and incredibly enjoyable (and wearable) sev[en] circle from Kirsten's fab pattern. And then the lovable little knitted creatures. They provided enjoyment on cold nights sitting in front to the TV and helped to build my knitting confidence.

This year, while I don't think I'll feel confident enough yet to tackle a cardigan, I'll definitely try a 'looped loop' scarf and maybe a kids poncho.

Any knitting projects in mind for you for 2012? Do tell, I'd love to hear.

Monday, January 9, 2012

2011 - sewing for kids

OK, my guilt from the last post (thanks, by the way, for your lovely comments) is somewhat diluted when I look at the montage below, as I have clearly not just kept myself clothed but the kids too. I really love sewing for kids. Even when they don't particularly take to the finished item. They're small, don't take much fabric and it kinda doesn't matter if they're not finished perfectly, which appeals to the side of me that enjoys some instant gratification sewing. I'd urge you to try it if you're thinking about it.


- - - - - - - - -

In other goings-on, over the holidays my laptop and my iphone both died - can you believe it?! Which forces me to live with communications in a different way, at least for now, forces me to adapt. Thank goodness I was able to salvage all of my photos from the laptop before it drew it's last breath. The same can't be said for all the phone numbers on the iphone, but really, the world's not going to end, is it. In some ways it's all a bit freeing, not being such a slave to the ibeasts! Ah, I'm sure I'll get over it and be desperate to tech up again soon ;-)

Saturday, January 7, 2012

A look back at 2011

Hi again, and happy new year!

For my first post of the year I planned to do a little montage of the things I made in 2011 to remind myself of how I spent my creative time and think of what might be nice to attempt this year. However, when I started collecting the images I realised just how many projects I'd done and I started going through a whole range of emotions...

Firstly there was surprise at the shear number of things I'd made. Then I felt pleased that I'd achieved a lot and a bit proud of myself for reaching some of my goals (she says shyly :-)... but then I looked at the shear number again and remembered a friend jokingly saying one day that I must be a bad mother as I was so prolific with my craft that I must neglect my kids. I knew she'd been joking, but there is a lot there - how did I do it? Did the kids get fed, do they remember who I am? ;-) So that emotion was clearly guilt. Then I felt a little sadness that I seemed to need to do so much, all the time!! What did this say about how satisfied or not I was with my everyday life??? What was the reason behind it all?

Anyway, enough over the analysis, I feel OK about it all now, because although I know I do go overboard at times (maybe all the new signs of aging I see in the mirror these days are because I'm not getting enough sleep ;-), being creative is just a huge part of who I am, and as I know I've said here many times before, it keeps me sane. Maybe what I can take away from this, though, is that it's all about balance... a little more balance is in order for 2012.

So... the following few posts will be pics of that crafting mania, organised into loose categories. I haven't linked them back to posts, but if you have any questions about anything, please email me or comment. I get so much inspiration from all of you out there that I'd like to think I could help inspire you too ;-)

OK, first up, by far the largest category, the totally self-indulgent Clothes for me (and why is it that I still feel I have nothing to wear? ;-)


Each new pattern I tried last year taught me new skills and for that I'm grateful. There was a bit of pocket work, shirring and gathering. Simplicity 3835 got a big workout, as did the Shearwater Kaftan and Schoolhouse tunic. All in all, I had lots of fun with them all and got a few really wearable pieces (and a few still needing adjustments).

Related Posts with Thumbnails